Both of Blender’s renderers — Cycles and Eevee — have the full support of Blender’s node-based materials. Get a full rundown of what each node does.
Survey of Material Nodes
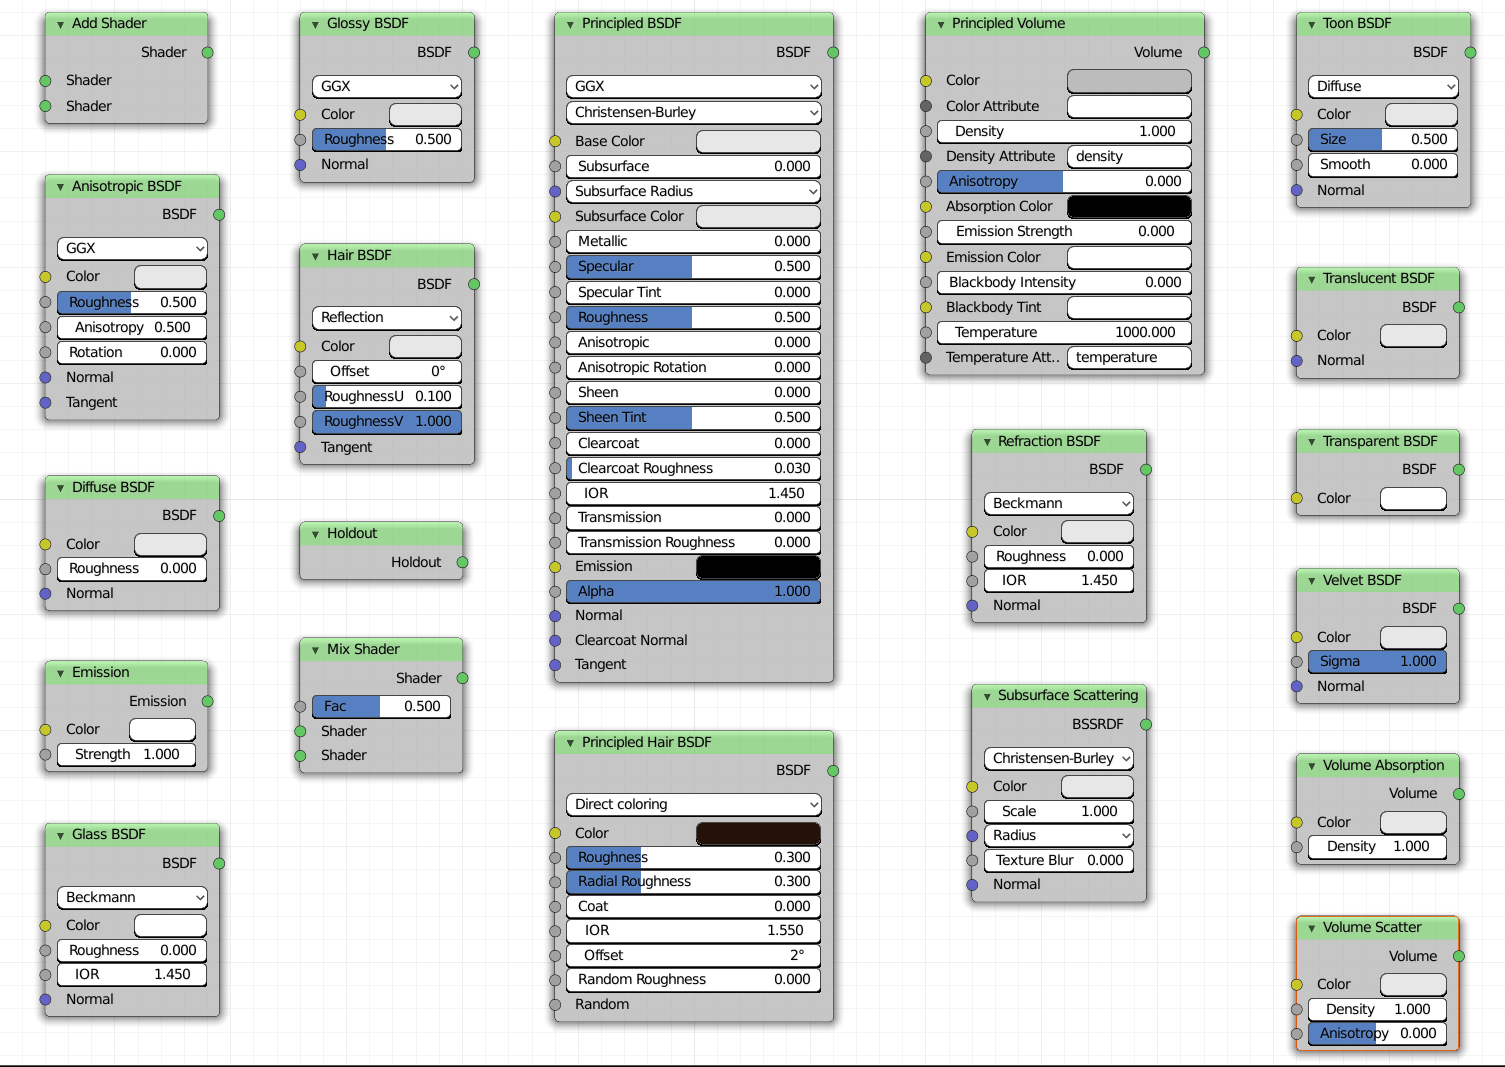
The following briefly describes each of the shaders available in Cycles:
- Add Shader: When creating materials, there are times when you want your material to have the properties of multiple shaders. For example, glass is glossy, transparent, and refracts light. Car paint has a diffuse color, but it’s also glossy. The Add Shader allows you to account for these multifaceted materials. That said, if you want to stick with physically correct materials, you may want to avoid the Add Shader unless you absolutely know what you’re doing. Otherwise, you could end up with a material that reflects more light than is shined on it.
- Anisotropic BSDF: Not all glossy materials reflect light evenly. For example, the brushed aluminum used in many industrial designs has a highlight that’s stretched along the grain of the brushing. In computer graphics, this effect is called an anisotropic highlight. The Anisotropic BSDF shader node is what you use to replicate it. This shader is only available in Cycles.
- Diffuse BSDF: The Diffuse BSDF shader is the foundation that many custom materials are based upon. With some exceptions (like metallic materials or fully transparent materials) nearly all materials have a base color of some sort. This shader is the primary way you define those colors.
- Emission: When using Eevee, you usually illuminate your scenes using light objects (see Chapter 10). In Cycles, it’s often more desirable to have meshes behave as light sources. And even if you’re using light objects, the Emission shader is still what you use to add light to your scene.
If you’re rendering fire, consider connecting the Emission shader to the Volume socket on the Material Output node rather than the Surface socket.
- Glass BSDF: When discussing the Add Shader, I mention that some materials, like glass, share the attributes of multiple shaders. Well, glass is a bit of a special case. It (and materials like it) shows up so frequently in 3D renders that it makes sense to have a convenience node that has all the attributes pre-mixed so you don’t have to remake it every time you need glass in your scene. The Glass BSDF is that convenience node in Cycles. Granted, you have more accuracy and control with the Principled BSDF shader, but the Glass shader works well for simple cases.
- Glossy BSDF: Some materials have a mirror-like reflectivity. The Glossy BSDF shader wields that control.
- Hair BSDF: I don’t care what you do in computer graphics, but any part of it that involves hair always is complex. And materials for hair are no exception. However, the Hair BSDF node in Cycles goes a long way toward giving you refined control over how hair on your objects appears when rendered. That said, it can still be complicated to use this specific shader. Unless you know what you’re doing or you’re working with a material from an older version of Blender, I’d recommend you use the Principled Hair BSDF described later in this list.
- Holdout: The Holdout shader is pretty unique among the shaders, because it has absolutely no basis in physical reality. With a Holdout shader, you’re basically saying, “There’s nothing here, not even background.” When Cycles renders a material with a Holdout shader, it makes that section of rendered image completely transparent, with an alpha of zero. This can be useful in compositing, because the effect can give you a 3D mask.
- Mix Shader: This shader, along with the Add Shader (covered earlier), is a powerful way of layering multiple shaders in a single material. The key to its strength is the Fac (short for factor) socket. You can uniformly control how shaders are mixed by adjusting this slider, or you can connect a grayscale texture to make one part of your object have the properties of one shader and another part of your object have properties of another (for example, a partially tarnished spoon will be glossy only where there isn’t any tarnish).
- Principled BSDF: This shader is the default shader you get when you add material to any object. It’s a general-purpose shader that gives you an abundance of control over nearly every material property you can think of. If you’re working with physically based materials that need to react to light like you would expect them to in meatspace, then your material should be based around a Principled BSDF. Even though the Principled BSDF is sometimes called an ubershader, that doesn’t mean you can easily re-create everything it does with a shader network consisting of a bunch of other nodes. Some materials can only be created accurately in Blender using this shader.
- Principled Hair BSDF: Cycles has a dedicated Hair BSDF (described earlier in this list). However, in order to get the most out of that shader, you really need to do a fair amount of work to mix it with other shaders. Like the Principled BSDF, this shader shortcuts that process a bit by bundling a bunch of controls into a single node and can give you more accurate results faster. Like the Hair BSDF, this one is only available if you’re rendering with Cycles.
- Principled Volume: Near the bottom of this list, I describe two separate volume shaders. Typically, if you’re making a material like fire or colored dust clouds, you need to make a node network that mixes those shaders together. This shader node exists so you don’t have to do all that extra work to get physically accurate results.
- Refraction BSDF: Most naturally occurring transparent materials like glass and water bend, or refract, light as it goes through them. The Refraction BSDF shader adds this property to your material.
- Specular: Specularity can be thought of as how your material reflects a light source and, generally speaking, disregards any bounced light contributions from the environment. If you just need a specular highlight on your material and you need to control how it behaves, this shader is for you. Of course, since this shader is doing something that is actually difficult to reproduce in a real-world lighting scenario, it’s only available if you’re rendering with Eevee.
- Subsurface Scattering: Have you ever put your hand in front of a flashlight and seen the light shine through your hand with a slightly reddish glow? In computer graphics, that effect is called subsurface scattering, or SSS for short. The light is scattered beneath the surface of your skin. You can try to achieve this by combining a bunch of the other BSDF shaders, but the result won’t be very accurate. This is because the subsurface scattering algorithm can’t be generalized as a BSDF. It’s a bidirectional surface-scattering reflectance distribution function (BSSRDF). That’s a lot of words to basically say, “Light can bounce around beneath the surface of a material, too.” What you need to know is that the Subsurface Scattering shader is used in realistic shaders for materials like skin, candle wax, and milk.
- Toon BSDF: Cycles is typically thought of and used as a physically correct renderer that can produce photorealistic results. However, Cycles isn’t limited to just photorealism. Using the Toon BSDF, you can produce a cel shaded look in Cycles, too. This shader is not available for Eevee, but Eevee has another trick up its sleeve for this kind of look in the form of the Shader to RGB node, covered at the end of this chapter.
- Translucent BSDF: Some materials, like sandblasted glass or thin linens, aren’t transparent, but things do show somewhat through them, like shadowy silhouettes. This is translucent behavior, and you can use the Translucent BSDF lend it to materials in your object.
- Transparent BSDF: Use the Transparent BSDF shader to make objects invisible in your scene. It may seem odd to think that there’s a shader specifically for making things not visible, but this shader is immensely helpful for hiding parts of objects and even animating their visibility.
- Velvet BSDF: The Velvet BSDF (only available if you’re using the Cycles render engine) behaves similarly to the Diffuse BSDF with the key difference being that light bounces off it less evenly. Where the Diffuse BSDF gives an even hue to a material, the Velvet BSDF yields a more mottled, uneven tone. Used smartly, you can use this shader to give a natural feel to cloth-like materials.
- Volume Absorption: This shader, along with the Volume Scatter shader (covered next), should be connected to the Volume socket on the Material Output node. You can use this shader alone for materials like black smoke or colored glass. For fire or materials with more of a subsurface scattering look, you’ll want to mix it with Volume Scatter, and possibly the Emission shader.
- Volume Scatter: It’s pretty rare that you’ll want to use this shader on its own. Typically, the Volume Scatter shader gets mixed with the Volume Absorption shader for volumetric effects like smoke and dust.
Of the three shaders that it makes sense to connect to the Volume socket of the Material Output node (Volume Absorption, Volume Scatter, and Emission), it’s helpful to think of them this way:- The Volume Absorption shader controls how much light gets trapped by the volume (black smoke).
- The Volume Scatter shader controls how much light the volume reflects (a bright cloud).
- The Emission shader controls how much light the volume generates (fire).
Previewing materials
As you work with your material in the Shader Editor, it can sometimes feel like you’re “flying blind” because it’s not immediately obvious what some changes to your node network do to your final material. Look Dev and Rendered viewport shading in the 3D Viewport are helpful in a general sense, but that could be slow on a large scene, especially if your final output is meant to be Cycles. Another solution would be to expand the Preview panel in Material Properties. Although the Preview panel isn’t a re-creation of your scene, or even your object, it’s an excellent way of getting an idea of what your material might look like. Below is what the Preview panel looks like.
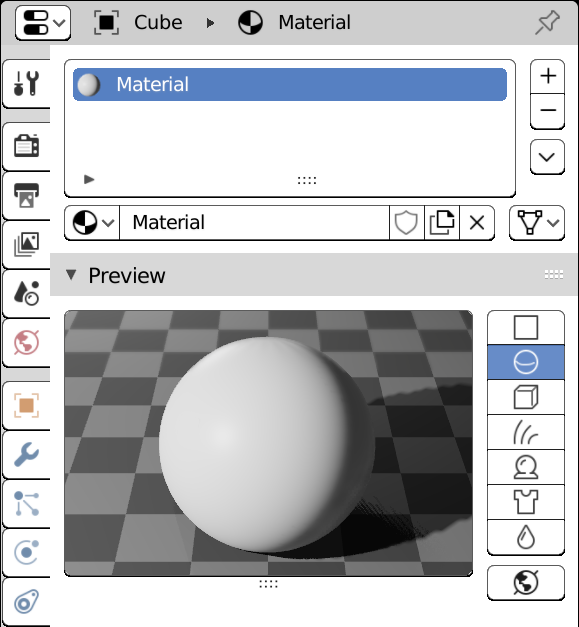
Along the right-hand side of the Preview panel are a series of buttons that you can use to change the preview image. Changing to one of these views is really helpful if, for example, you’re working on a hair material rather than a more surface-level material. Blender gives you the following options:
-
 Flat: Choose this option if you want to see what your material looks like on a flat object facing the camera. Admittedly, this one is of limited usefulness, but it can be handy when previewing textures (see Chapter 9).
 -
 Sphere: A sphere on a checkerboard plane. If your object has a simple curved surface, this preview option is the next best thing.
 -
 Cube: Because the humble cube is the starting point for so many mesh models, it’s worth it to include one as a preview. Seriously, though, sometimes I’m amazed at how frequently boxes appear in 3D work.
 -
 Hair: Computer-generated hair is one of the most computationally expensive things to create materials for. Use this preview type to give you faster feedback and better hair days for your 3D models.
 -
 Shader Ball: This preview is a really solid general-purpose preview type. The general shape has enough complexity to show how your material will look on detailed models. However, there’s more to it than that. The 3D model that makes this preview scene also includes features that help you gauge a material’s effectiveness with subsurface scattering or translucency.
 -
 Cloth: To be honest, I don’t find myself using this one very frequently because I personally prefer the Shader Ball preview for seeing complex objects with my materials. However, if you’re specifically doing work on cloth-like materials, this preview type can be pretty handy.
 -
 Fluid: If you’re making a material for any kind of liquid, this preview is incredibly helpful. The Shader Ball can get you partially there, but this preview does a much better job of giving you an idea of what liquid materials will look like when rendered.
 -
 Preview World: This final button really isn’t a preview type. It’s actually a toggle. If you enable this button, the preview scene will make use of your World settings so you have a more accurate representation of what your material might look like in your specific world lighting.
Now, I know that blowing through a list of shaders like this is kind of like drinking from a firehose. There’s a lot in there. My recommendation is to embrace play and experimentation. Set up a simple 3D scene and try out these materials on them. Swap nodes in and out, mix them together, and then start trying to make interesting or realistic materials. Get a good feel for the differences between the results one shader node gives you when rendering with Eevee versus when you render with Cycles. All of this play serves as a great way to build up your experience with the shaders and how they behave. Eventually, you’ll get to the point where you’ll see a particular material effect and you’ll think to yourself, “Hey, I know exactly the node setup I’d use to get that look.”
The other strategy would be to just get really good at using the Principled BSDF. That’s a dense node with an enormous amount of built-in capability. Master that node and most of the world’s physically-based materials are at your disposal.
Whichever approach you take, make sure to have fun. If you can’t smile while you’re making cool stuff, then you should modify your approach until you can.
Latest Posts
Stickman!
Baking Texture Maps from Your Mesh